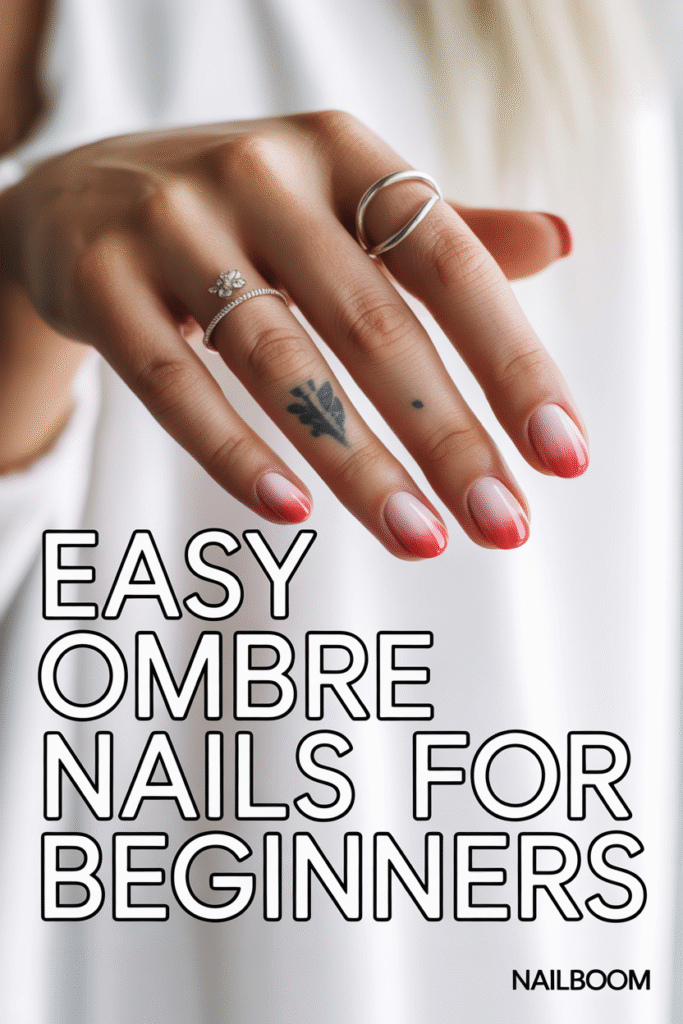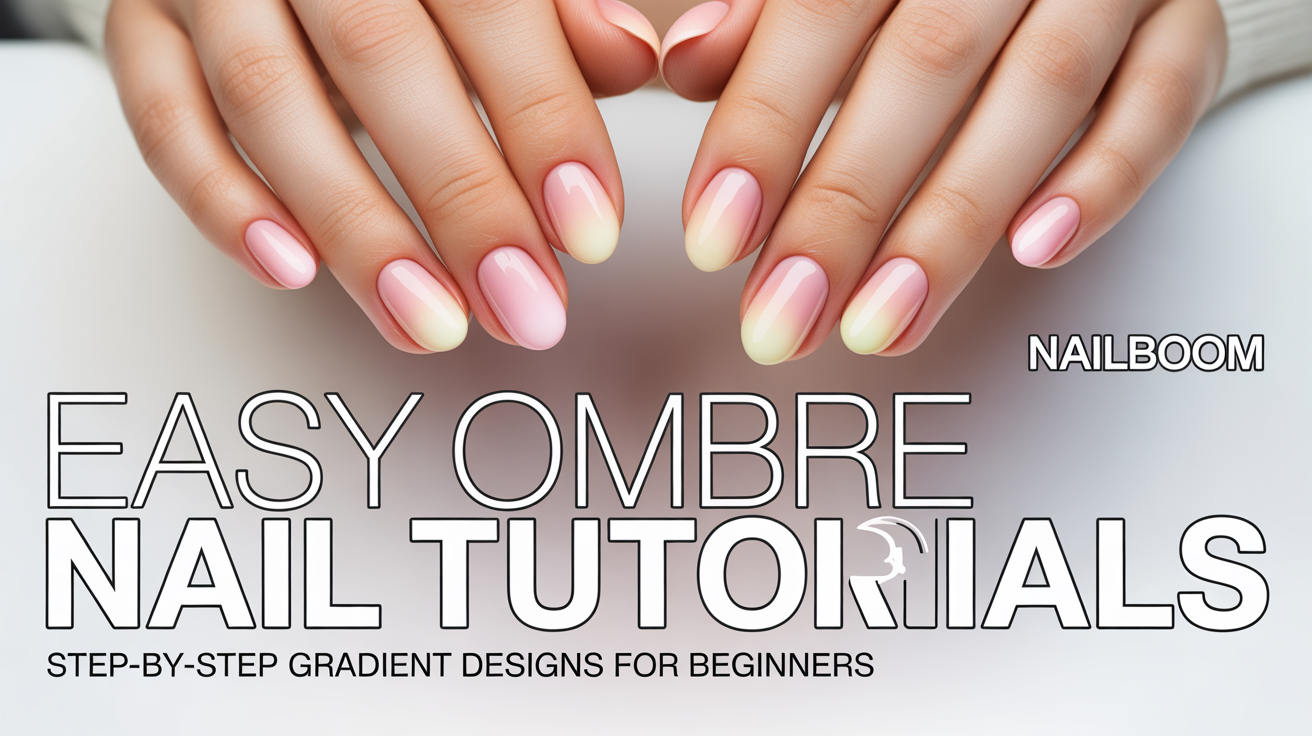
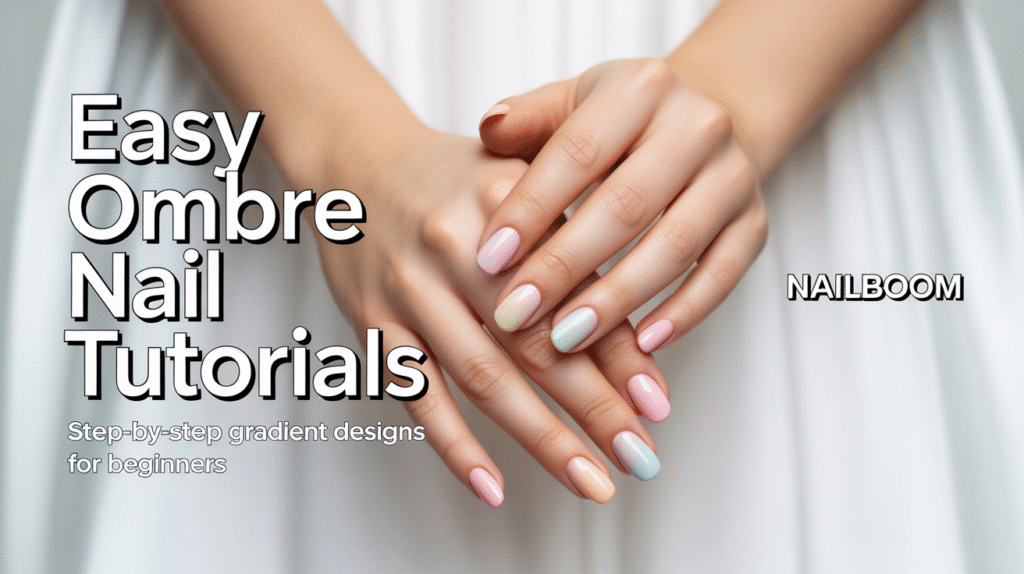
Easy Ombre Nail Tutorials are one of the most beautiful and beginner-friendly nail trends—perfect for anyone who loves soft blends, dreamy gradients, and eye-catching finishes. Whether you prefer subtle neutral fades or bold color transitions, ombre designs allow you to create salon-worthy results right at home. With just a sponge, a few polishes, and the right technique, gradient nails become surprisingly easy, even if you’re completely new to nail art.
Easy Ombre Nail Tutorials
What makes ombre nails especially loved is their versatility. You can go classy with pink-to-white fades, playful with rainbow blends, or elegant with metallic tones. They pair beautifully with short, medium, and long nails—making them ideal for any style, outfit, or occasion. Plus, they’re super customizable, so every manicure feels unique and personal.
In this beginner-friendly guide, you’ll learn step-by-step ombre nail tutorials that are simple, quick, and perfect for practicing your gradient blending skills. From soft pastel fades to bolder multi-color looks, we’ll walk through each design with easy tips to help you master the technique. Get ready to create gorgeous ombre nails that look polished, professional, and totally Pinterest-worthy!
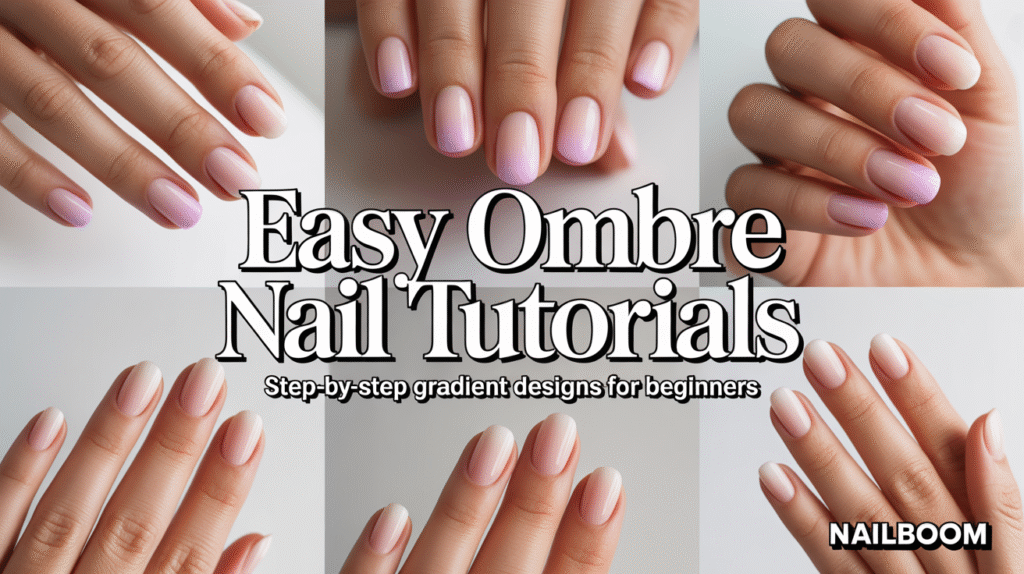
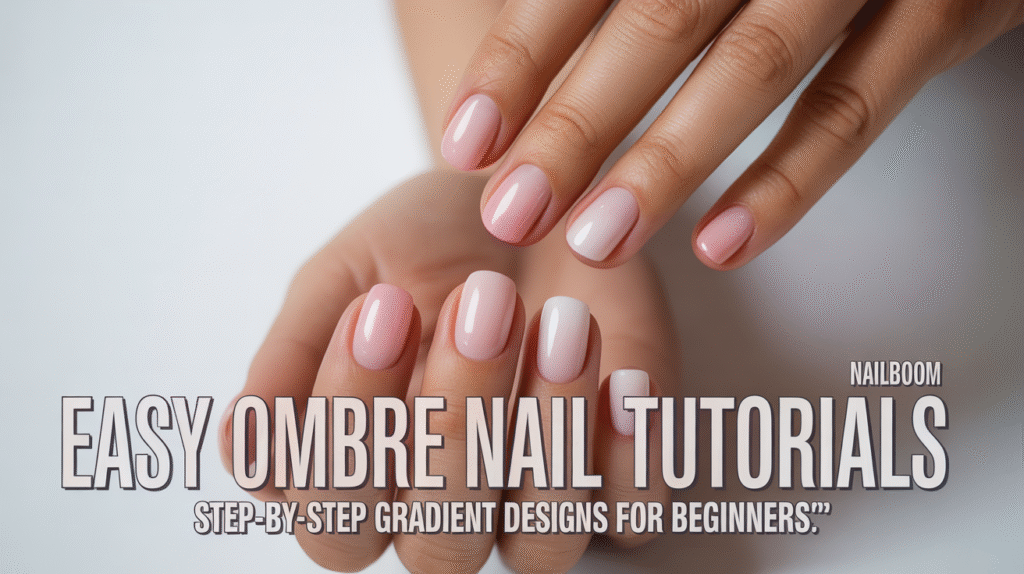
1: Soft Pink-to-White Ombre (Beginner-Friendly Classic)
The soft pink-to-white ombre is one of the easiest and most timeless designs for beginners. It gives your nails a clean, elegant look that’s perfect for daily wear, weddings, work, or any minimalist aesthetic. This design uses simple blending and light colors, which makes mistakes less noticeable—ideal for learning gradient techniques.

Start by applying a sheer pink or nude base coat to all your nails. Let it dry completely. On a small makeup sponge, paint two stripes: one of soft pink and one of white, touching side by side. Gently dab the sponge onto your nail, starting at the tip and working upward to create a smooth gradient. Light tapping motions blend the colors seamlessly, so take your time and reapply polish to the sponge as needed.
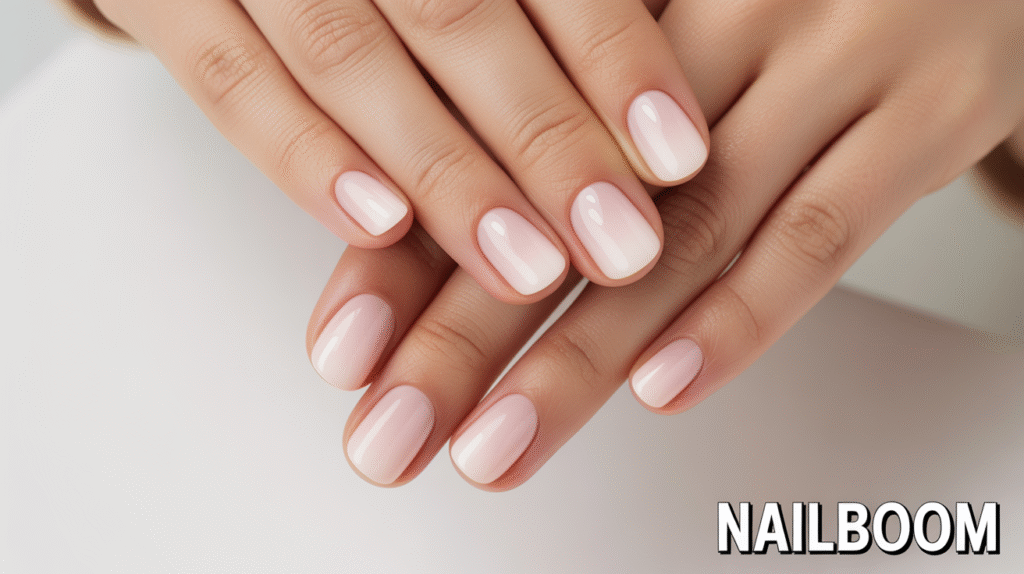
Finish with a glossy top coat to melt the colors together and give the ombre a smooth, airbrushed finish. If you want a softer fade, repeat the sponge tapping once more before the top coat. Clean up the edges using a brush dipped in acetone. This classic pink-to-white ombre is the perfect first step in mastering gradient nails—simple, chic, and always eye-catching.
2: Pastel Rainbow Ombre (Soft & Playful Gradient)
Pastel rainbow ombre nails are perfect for beginners who want something a little more colorful while still keeping a soft, dreamy aesthetic. This look blends multiple pastel shades—lavender, mint, baby blue, peach, and soft yellow—into a seamless gradient across all your nails. It’s a gorgeous design for spring, summer, or anytime you want a cheerful, whimsical manicure.

Start by painting your nails with a light base coat, preferably white or pale nude, to help the pastel colors pop. Use a makeup sponge and apply two or three pastel shades in horizontal stripes. Gently dab the sponge onto each nail, letting the colors blend naturally. You can alternate color combos per nail for a cascading rainbow effect across your hand. Don’t worry if the first layer looks faint—pastels often require two or three passes for full opacity.
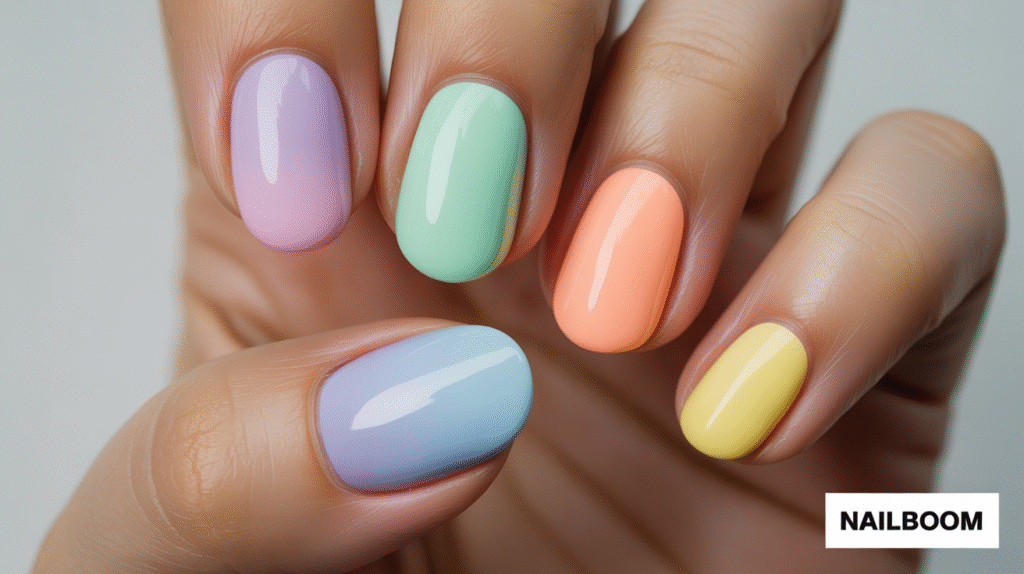
Finish the design with a glossy top coat to smooth the surface and bring all the pastel tones together. The top coat gives the final look an airbrushed, cotton-candy-like softness. Clean up around the cuticles, and you’re done! This pastel rainbow ombre is a fun way to experiment with more colors while still following beginner-friendly steps.
3: Nude Caramel Ombre (Warm, Natural & Everyday-Friendly)
If you prefer something warm, neutral, and wearable for every day, the nude caramel ombre is the perfect choice. This gradient blends soft beige tones with warm caramel shades, creating a subtle yet classy fade suitable for work, special events, or casual outfits. It’s a great starting point for beginners because the colors are close in tone, making blending much easier.
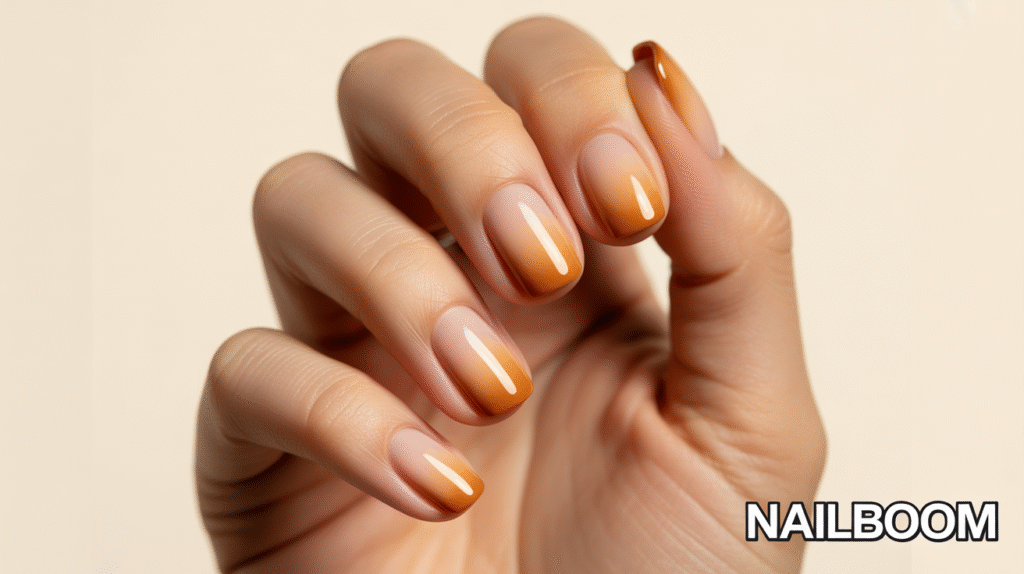
Begin with a nude or beige base coat that matches your natural nail tone. Once dry, take your makeup sponge and apply a strip of nude polish and a strip of caramel polish directly beside each other. Lightly dab the sponge onto the nail, focusing the caramel shade toward the tips and keeping the nude near the cuticle. Use soft tapping motions to create a smooth, warm gradient.
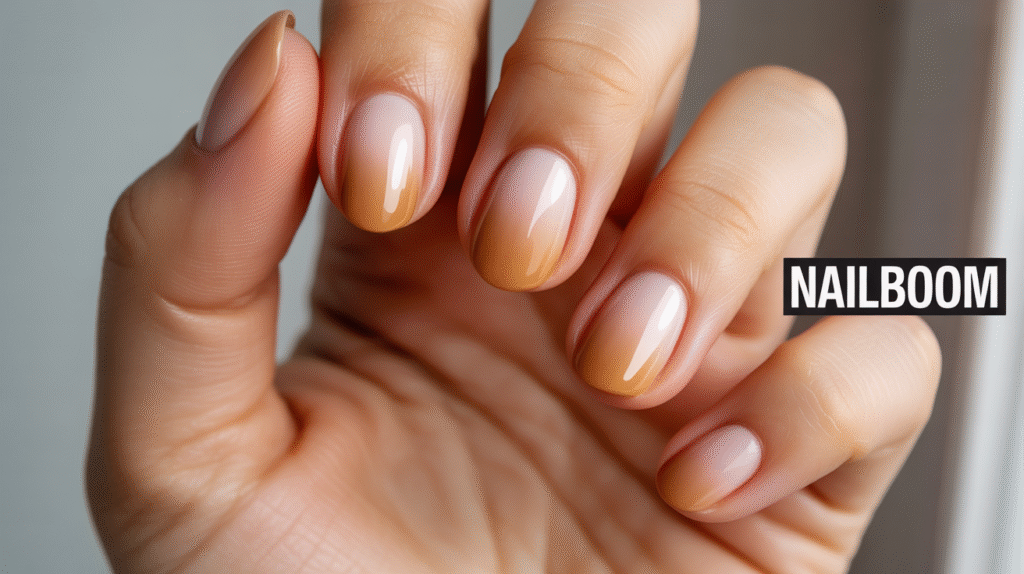
After achieving your desired blend, seal the design with a glossy top coat. This helps merge the nude and caramel shades even more, giving your nails that smooth, airbrushed ombre effect. Clean any polish around your cuticles for a neat, professional finish. The nude caramel ombre is timeless, chic, and ideal for beginners who love warm, natural tones.
4: Lavender Dream Ombre (Soft, Romantic & Calm)
Lavender ombre nails are perfect for beginners who love a soft, calming aesthetic. This design blends pale lavender into a deeper purple tone, creating a dreamy gradient that feels peaceful, feminine, and effortlessly elegant. It’s especially beautiful for springtime, date nights, or any look inspired by pastel vibes.
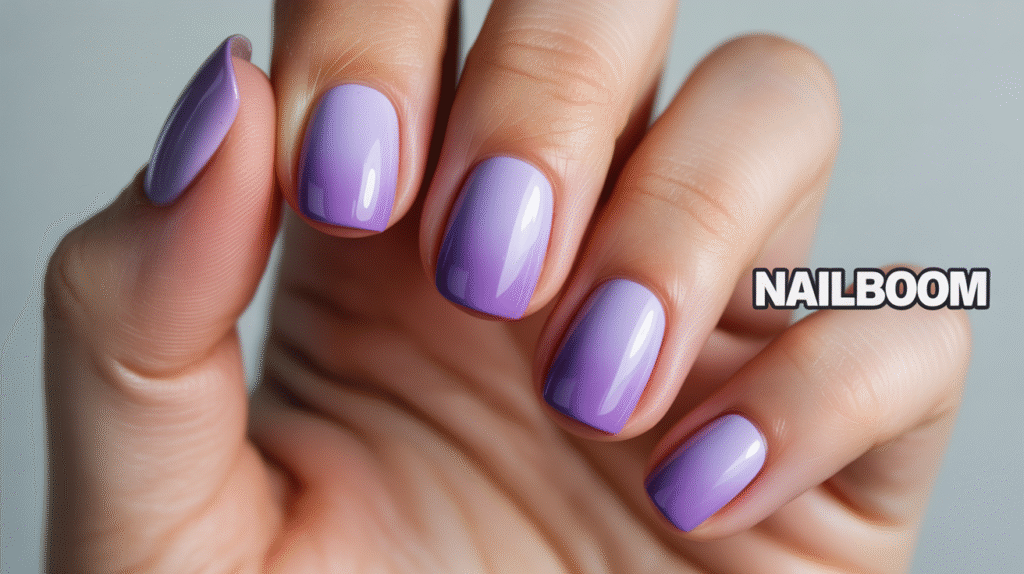
Start with a light lavender or soft lilac base coat to give your nails a smooth foundation. On your makeup sponge, apply two purple shades—lighter at the cuticle area and darker toward the tip. Gently tap the sponge onto the nail, moving slightly up and down to blend the colors softly. Lavender tones blend easily, which makes this design ideal for those still learning how to control gradient transitions.

Once you’re happy with the fade, apply a glossy top coat to enhance the gradient and smooth out any texture. The shine brings the lavender hues together beautifully, giving your nails a soft, ethereal finish. Clean the edges with a small brush and acetone, and you’ll have a romantic lavender ombre perfect for any soft-glam look.
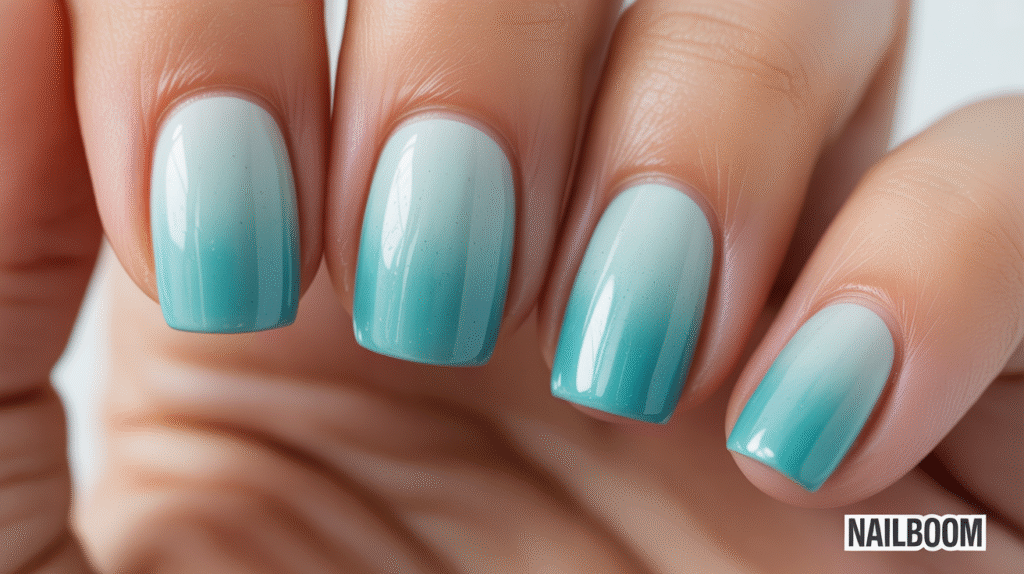
5: Blue Ocean Ombre (Fresh, Cool & Beginner-Friendly)
The blue ocean ombre is perfect for anyone who loves cool tones and refreshing, beachy vibes. This gradient blends light sky blue into deeper ocean blue, creating a crisp and calming look. It’s a great option for beginners because blue shades blend smoothly and create a striking gradient without requiring advanced blending skills.
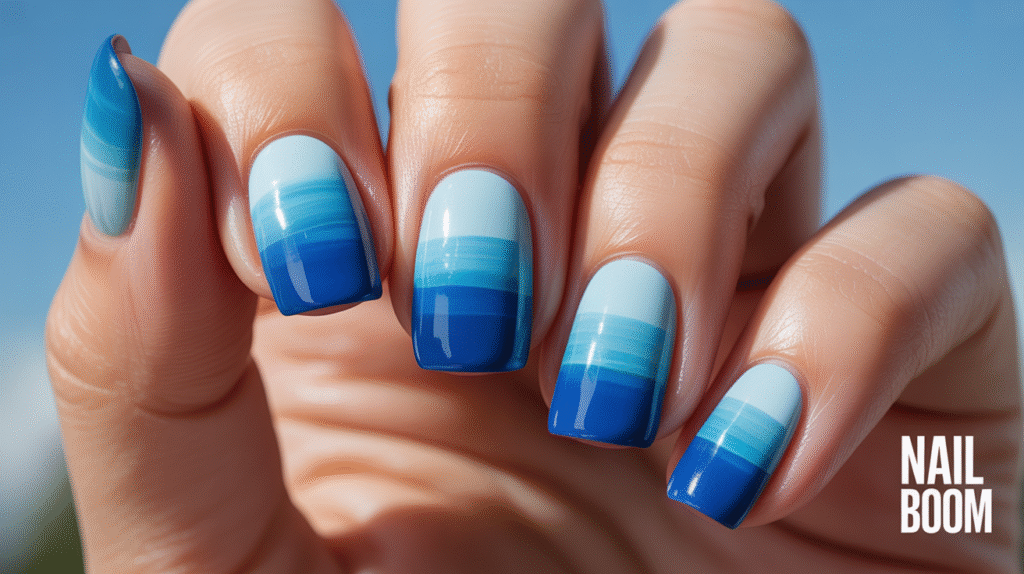
Start with a soft sky-blue or baby-blue base coat to brighten the gradient. On a makeup sponge, paint two stripes—one light blue and one medium or deep blue—right next to each other. Tap the sponge gently onto your nails, keeping the darker blue toward the tips for that ocean-wave effect. Apply a couple of sponge layers if needed until the gradient becomes smooth and even.
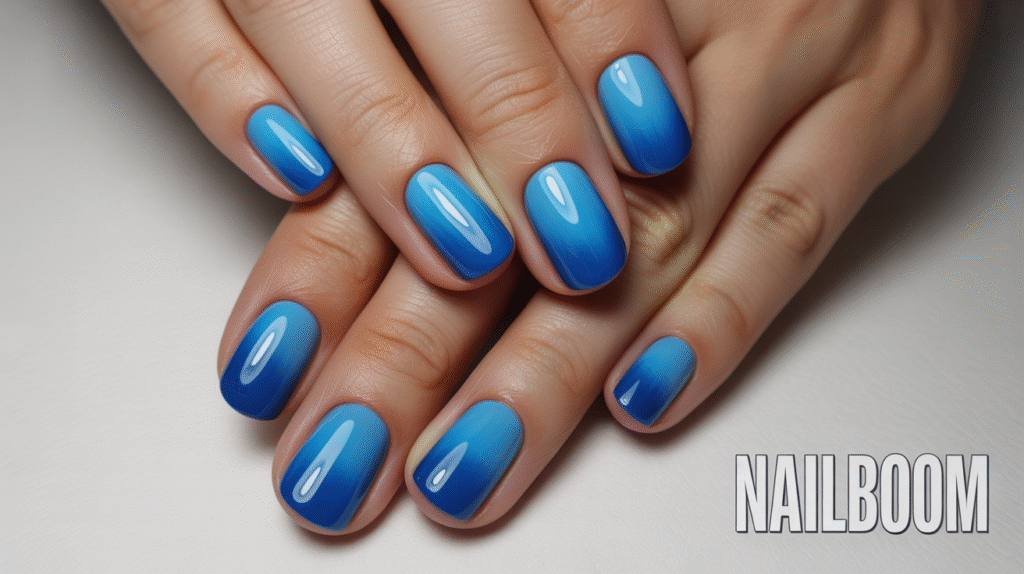
Complete the look with a glossy top coat to melt the colors together and give the design a glassy, water-like shine. The finish enhances the blue tones and makes the fade look professional and polished. Clean around the edges for a crisp result, and you’ll have gorgeous ocean ombre nails that are perfect for summer, vacations, or everyday cool-tone styles.
6: Peach Sunset Ombre (Warm, Glowy & Softly Vibrant)
The peach sunset ombre is perfect if you love warm, glowing colors that feel cheerful and radiant. This gradient blends soft peach into a gentle coral or warm orange, creating a sunset-inspired fade that’s eye-catching but still easy for beginners to recreate. The warm tones blend beautifully, making the transition look smooth even with minimal practice.
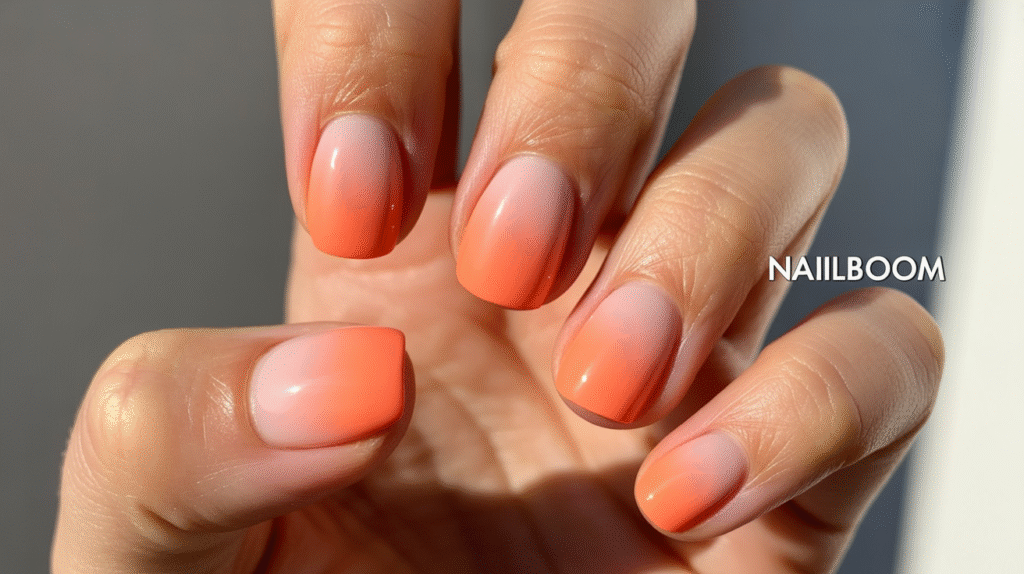
Start with a light peach or soft nude base coat to provide a bright foundation. On your makeup sponge, paint a stripe of peach followed by a stripe of coral or warm orange. Gently tap the sponge onto the nail, focusing the deeper shade on the tips and the lighter peach near the cuticle. If you want a more dramatic “sunset,” go over the gradient a second or third time until the colors pop.
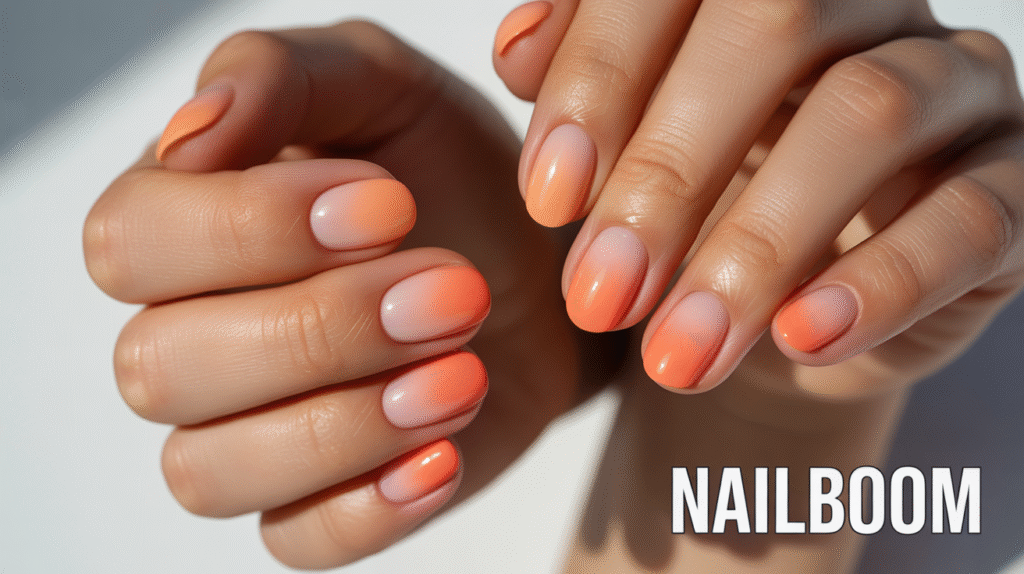
Finish with a glossy top coat to merge the shades and give your manicure that radiant, glowing sheen. The shine enhances the warm tones, making your nails look soft, juicy, and smooth—like a perfect summer sunset. Clean up around the edges, and your peach ombre will look beautifully blended and salon-level.
7: Mint Frost Ombre (Fresh, Clean & Refreshingly Simple)
Mint frost ombre nails are perfect for anyone who loves crisp, fresh colors with a soft, icy vibe. This gradient look blends pale mint into a slightly deeper turquoise or cool green shade, creating a clean and refreshing finish. The colors are light and forgiving, which makes this design extremely beginner-friendly—ideal for practicing smooth transitions without harsh lines.
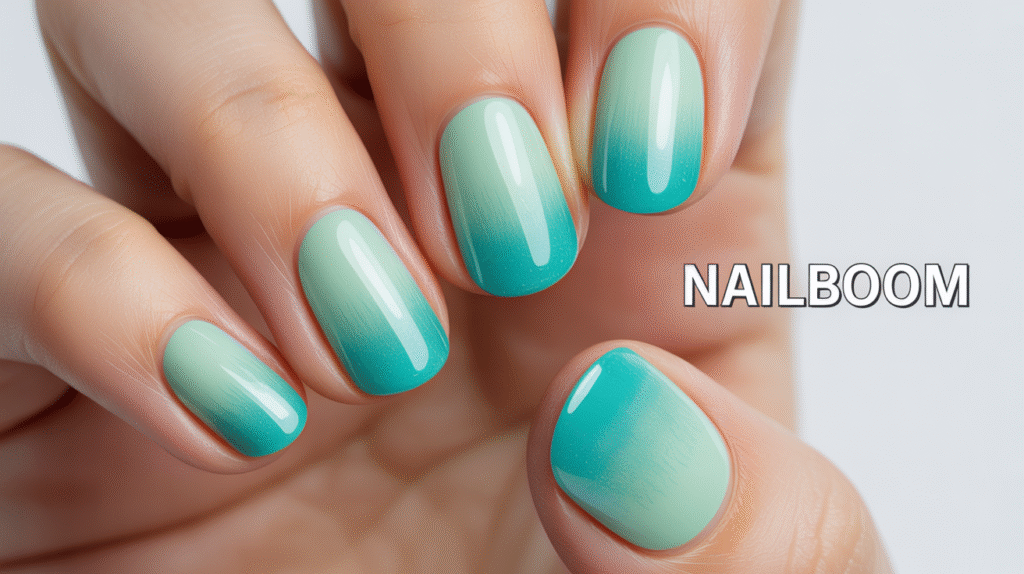
Start with a pale mint or soft green base coat to brighten your gradient. On your makeup sponge, add a stripe of light mint polish and a stripe of deeper turquoise or cool green beside it. Lightly tap the sponge across your nails, keeping the darker shade near the tips for that frosted effect. The cool-toned colors naturally melt together, so the blending process feels effortless even for first-timers.
Apply a glossy top coat to smooth the texture and bring out the icy, frosted shine. This final layer locks in the minty gradient and creates a polished, refreshing look. After cleaning around the cuticles, you’ll have a set of mint frost ombre nails that feel airy, modern, and perfect for any fresh, clean aesthetic.
8: Rose Gold Shimmer Ombre (Glam, Sparkly & Beginner-Friendly)
If you love a touch of glam without going overboard, the rose gold shimmer ombre is the perfect choice. This look blends soft nude or blush tones into a sparkling rose-gold tip, creating a chic gradient that feels both elegant and eye-catching. Because shimmer polishes blend easily, this design is extremely beginner-friendly—even if you struggle with smooth fades.
Start with a nude, blush pink, or soft beige base coat to create a natural starting point. On your makeup sponge, apply a stripe of your nude shade followed by a stripe of rose-gold shimmer. Gently dab the sponge onto your nail, keeping most of the shimmer toward the tips for that glowing ombre effect. If you want extra sparkle, reapply shimmer to the sponge and tap again for a more glittery finish.
Seal the entire design with a glossy top coat to enhance the shimmer and smooth out the gradient. The top coat helps the glitter melt into the nude shade beautifully, giving your nails a soft, luminous finish. Clean any edges around your cuticles, and you’ll have luxurious rose-gold ombre nails that shine without being too bold—perfect for parties, weddings, or everyday soft glam.
9: Grey Smoky Ombre (Chic, Modern & Effortlessly Cool)
The grey smoky ombre is the perfect choice if you want a modern, edgy look that’s still simple enough for beginners. This gradient blends soft grey into a deeper charcoal shade, creating a smoky fade that feels sleek, stylish, and slightly mysterious. It’s a versatile design that pairs beautifully with minimalist outfits, streetwear looks, or cool-toned aesthetics.

Start with a light grey base coat to create a smooth, even foundation. On your makeup sponge, paint a strip of light grey and a strip of charcoal or deep grey right beside each other. Gently tap the sponge onto the nail, focusing the darker shade on the tips for that smoky, shadow-like effect. Repeat the tapping once or twice until the gradient looks seamless and bold enough for your taste.
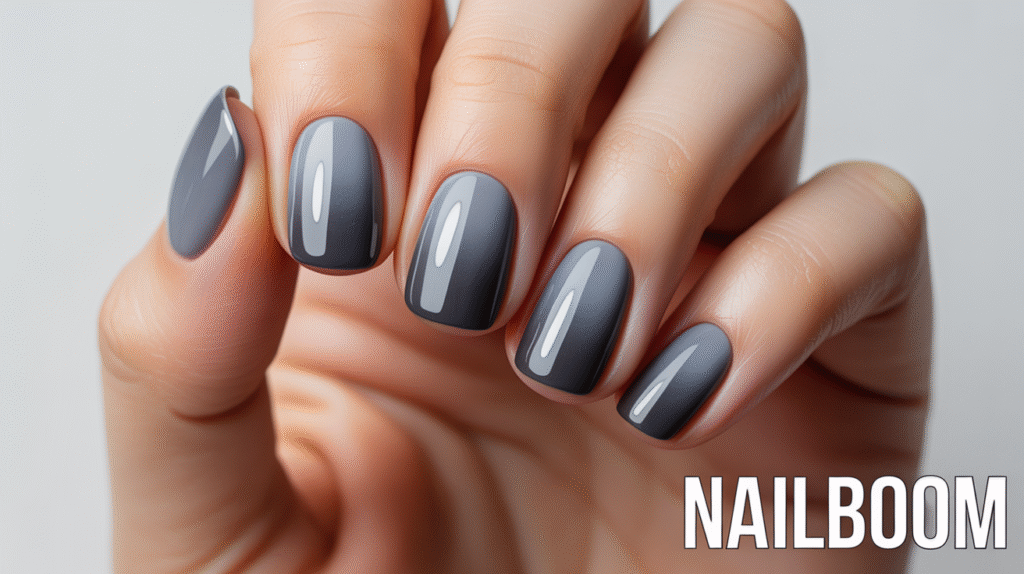
Finish the look with a glossy or matte top coat—either works beautifully. A glossy top coat enhances the gradient for a polished, airbrushed look, while a matte finish gives a soft, velvety, smokier effect. After cleaning the edges with a small brush and acetone, you’ll have a stunning grey ombre manicure that looks effortlessly chic and modern.
10: Black-to-Silver Glam Ombre (Bold, Sparkly & Eye-Catching)
If you love dramatic nails with a glamorous twist, the black-to-silver ombre is a perfect beginner-friendly design that looks ultra-sleek and professional. This gradient starts with bold black at the base or tip (your choice!) and melts into sparkling silver for a stunning, high-contrast finish. The glittery silver makes blending effortless, making this a great ombre for beginners who want something bold without the stress.
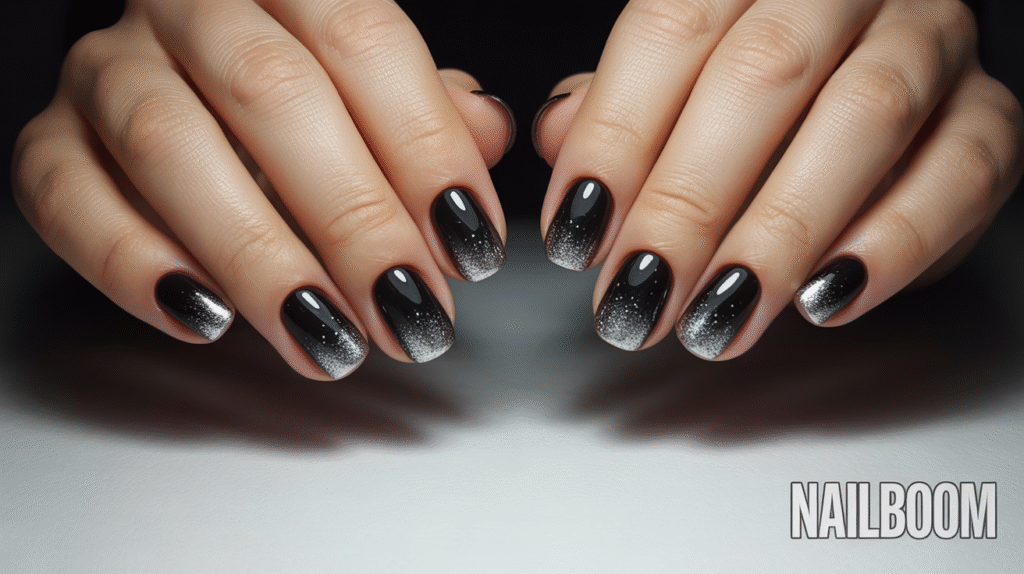
Start with a solid black or deep charcoal base coat—whichever direction you want the fade to move. On your makeup sponge, apply a strip of black polish beside a strip of metallic or glittery silver. Gently dab the sponge onto your nail, working the silver into the black until the gradient looks well blended. The shimmer naturally softens the transition, helping you achieve a flawless fade with minimal effort.
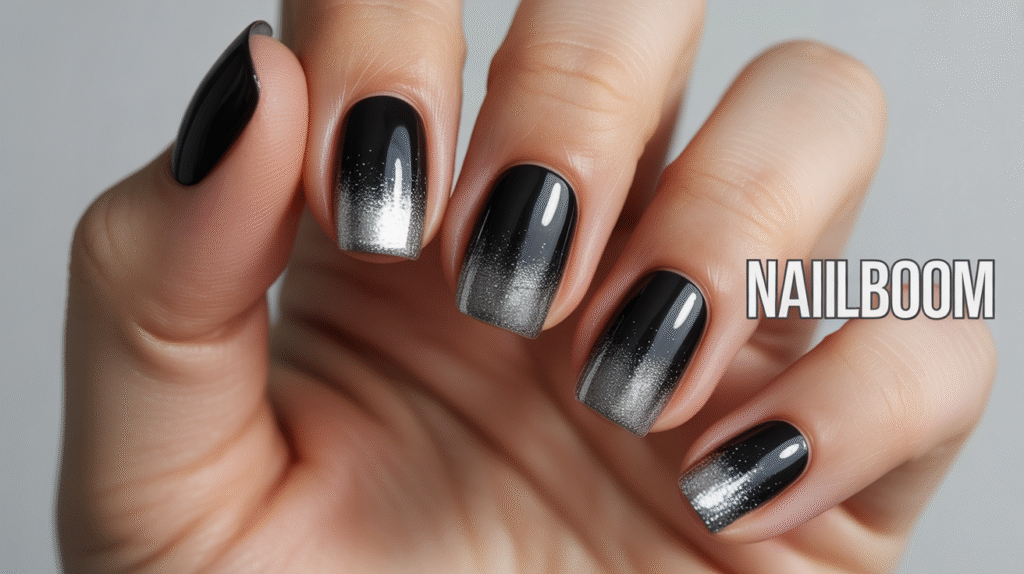
Seal your design with a glossy top coat to smooth the texture and intensify the shine. The top coat makes the gradient look fluid and flawless, giving the nails a sparkly finish that’s perfect for parties, nights out, New Year’s looks, or any bold-glam moment. Clean up the edges, and your black-to-silver ombre will look beautifully dramatic and totally Pinterest-worthy.
Final Thoughts
Ombre nails are one of the easiest and most rewarding nail art techniques for beginners. With just a sponge, a few polish colors, and a bit of practice, you can create beautiful gradients that look like they came straight from a professional salon. Whether you prefer soft pastels, warm neutrals, bold metallics, or playful rainbow blends, there’s an ombre style for every mood and occasion.
The best part? As you explore different color combinations, you’ll quickly see your blending skills improve—making each new design easier than the last. Ombre nails offer endless creativity, allowing you to experiment with tones, textures, and finishes until you discover the styles you love most. They’re versatile, customizable, and perfect for both everyday wear and special moments.
So grab your favorite polishes, a handy makeup sponge, and start blending! Each of these tutorials was created with beginners in mind, ensuring your ombre nail journey feels fun, simple, and beautifully rewarding. Your next set of gorgeous gradient nails is just a few taps away!